有很长一段时间没有写博客,刚好最近对Java体系有系统学习的想法,有机会也可以总结一下这段时间以来的成长,虽然一直坚持写可能有更好的收获
概要
并发编程分几个部分
- 基础概念
- Java 里的线程
基础概念
CPU 核心数和线程数
一直以来 CPU 核心数和线程数是 1 比 1 的关系,像 2006 年 Intel 发布的 Core2 双核处理器。2002 年 Intel 发布奔腾4处理器,推出其创新超线程(hyperthreading) 技术,使得核心数与线程数变成 1 比 2 的关系。像如今的 i9-9900 就是八核十六线程的
CPU 时间片轮转机制
时间片轮转调度是一种最古老,最简单,最公平且使用最广的算法,又称RR调度。每个进程被分配一个时间段,称作它的时间片,即该进程允许运行的时间。基本上可以理解为给队首分配一定的时间片,然后丢到队尾。
进程间的切换是需要一定时间的,保存和装入寄存器值及内存映像,更新各种表格和队列等,称为上下文切换
进程和线程
进程是操作系统对一个正在运行的程序的一种抽象,也是程序运行进行资源分配的最小单位。进程之间资源是相互独立的
线程运行在进程的上下文中,同一进程下的多个线程共享同样的代码和全局数据,也是 CPU 调度的最小单位
并行和并发
- 并发指一定时间内处理多个事情的能力
- 并行指同一时间可以处理多个事情的能力
一边打电话一边吃饭就是并行
打完电话,吃饭,洗碗,这段时间内做的事情就是并发能力
并发编程需要解决的问题
- 线程共享资源,存在冲突
- 死锁
- 线程数太多,导致资源消耗殆尽
JAVA 里的线程
线程管理接口
ThreadMXBean。Java 天生就是多线程,启动多个守护线程
1 | public static void main(String[] args) { |
启动线程的方式
- 继承 Thread 类
- 实现 Runnable 接口
- 实现 Callable 接口
但 new Thread() 不接收 Callbale 接口,所以需要 FutureTask 进行包装
1 | public static class CallableClazz implements Callable<String> { |
稍微看一下 FutureTask
- FutureTask 实现 Runnable 接口
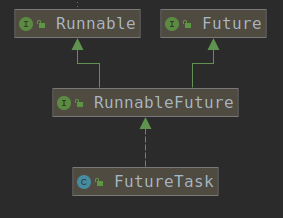
- FutureTask 的 run 方法
1 | // 可以看到在 run 方法里面执行了 call 方法 |
线程停止
- 运行完毕
- 抛出异常
- 主动停止
- 废弃方法:stop()、resume()、suspend()。因为不能保证资源的释放,容易造成程序不可知问题和死锁问题
- 新方法
- interrupt() 中断线程
- isInterrupted() 判定当前线程是否中断状态
- interrupted() static 方法,判定当前线程是否中断状态。会清除中断状态,即改为 false,这是最大的区别
1 | // 如果连续调用这个方法,第二次会返回 false |
Java 线程是协作式线程,调用了 interrupt() 不一定会中断线程
1 | // 这里调用了 interrupt 方法,但没有根据中断状态进行处理,是不会停止的 |
当线程方法抛出 InterruptedException时,线程中断标志位会复位成 false
1 | /** |
这时候如果在线程运行时,抛出 InterruptedException,而没有重新将中断标志为改为 true,是不会停止的
1 | // 只要在 catch 里再调用一下 interrupt() 方法,中断标志位就会改为 true,从而退出循环 |
Java 线程
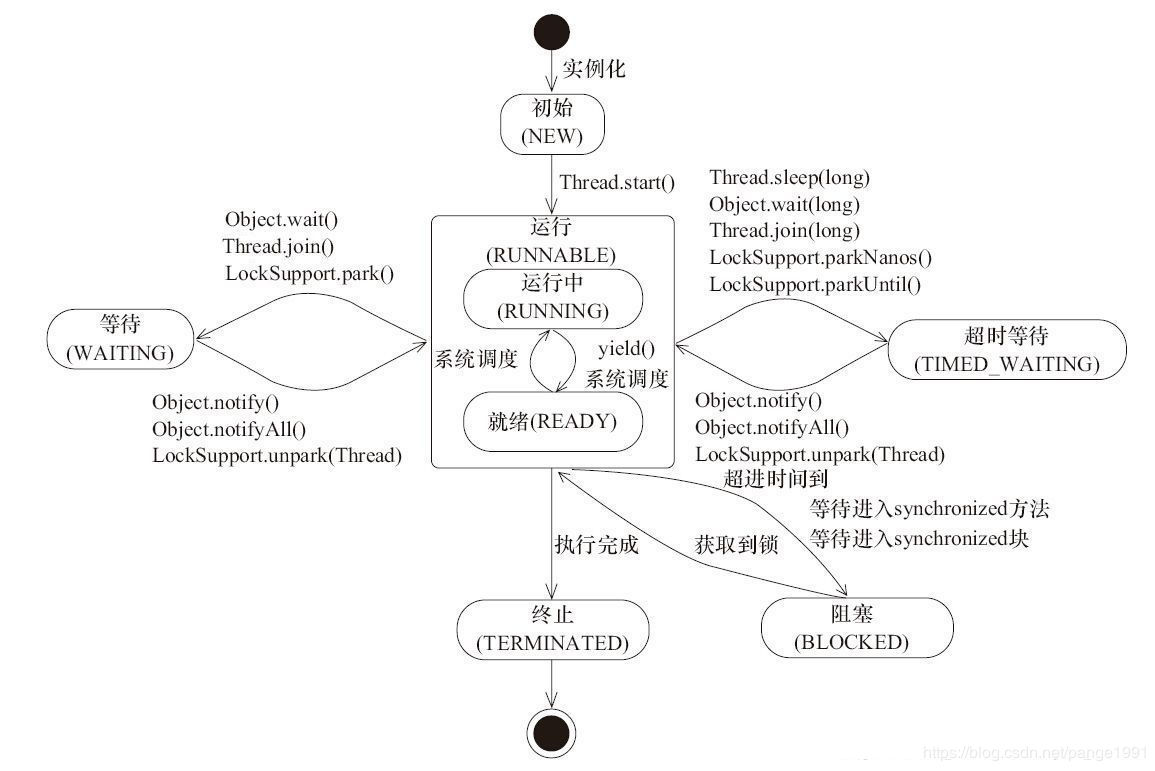
Java 线程状态
- NEW
- RUNNABLE
- BLOCKED
- WAITING
- TIMED-WAITING
- TEMINATED
run 和 start 方法
直接调用 run 方法跟调用一个对象的普通方法没有任何区别,不会让虚拟机创建线程
线程的优先级
- 优先级分 1~10 个等级,默认等级为 5,越小越高,cpu分配时间片会越多
- 但是操作系统可能没有理会这个优先级,所以不一定会有效
守护线程
- 主线程死亡,守护线程也死亡。例如 GC 线程
- 注意 try finally 对守护线程无效
Java 线程间共享
synchronized 内置锁
Java 内置锁分为对象锁和类锁
- 多个线程获取的锁是不同的对象,是可以同时运行的;多个线程获取的锁是同一个对象,是一个接着一个运行的
- 类锁锁的是 Class 对象
- synchronized 修饰 static 方法是类锁
1 | // 类锁 |
volatile 关键字
- 读取时从主内存读取;设置时刷新到主内存
- 没有使用锁,是最轻量级的同步机制,非线程安全
- 使用场景,只有一个线程写,多个线程读
1 | // volatile 不保证原子性 |
ThreadLocal
- 用空间换线程的安全性
- 线程级别变量隔离
- 主键为线程,值为需要存的值
线程协作
等待和通知
Java 线程协作中有一对方法 wait/notify/notifyAll,最典型的应用是生产和消费者模式
这里有一个标准的范式
- 等待方
- 获取对象的锁
- 循环里判断是否满足条件,不满足调用 wait
- 如果满足,执行业务逻辑
- 通知方
- 获取对象的锁
- 改变条件
- 通知所有等待的线程
具体到代码
1 | public static class ThreadClazz extends Thread { |
这里要注意 notify 和 notifyAll 的区别,notify 会选取一个线程进行唤醒,有时候唤醒的线程并不是完成你工作的线程。所以尽量使用 notifyAll 进行唤醒
等待超时范式
等待超时常用于连接池
1 | // 伪代码 |
一个自定义数据库连接池的例子。当 wait 超时时,这里返回了 null,实际情况会抛出异常
1 | // 实现 java.sql.Connection 接口 |
1 | // 实现连接池 |
1 | // 测试 wait 超时 |
1 | // 运行结果 |
join 方法
线程A调用了线程B的 join 方法,需要等待线程B执行完,才能继续完成工作
类似于邀请其他人插队一样的感觉,然后其他人还可以邀请人进行插队。。。
几个方法对锁的影响
- yeild()、sleep() 调用之后,持有的锁是不会释放的
- 调用 wait() 方法之前必须持有锁,调用之后会释放锁,wait() 方法返回后会继续持有锁
- 调用 notify() 方法之前必须持有锁,调用之后本身不会释放锁,执行完代码块时才释放。所以notify一般写在代码块的最后面